Tuesday, December 27, 2011

Sour Cream Coffee Cake

I made this last week for work.  I had to do some training as I've been looking for an excuse to make this coffee cake again.  The recipe was given to me almost 8 years ago at my wedding shower.

 This is a view straight from the oven.
 A close up of the top!  Yum!  That wonderful cinnamon sugary goodness.
 Here is the final look.  The recipe doesn't call for any kind of frosting or drizzle but I added a simple powdered sugar, vanilla and milk glaze.
This is what the cake looks like when you cut in to it.  I think next time I'll put one layer of batter, then the cinnamon sugar another layer of batter, more cinnamon sugar then more batter and finally more cinnamon sugar.  I think that would look prettier and taste even more cinnamony!

Sunday, December 25, 2011

Merry Christmas Cake Pops

Cake Pops have been all the rage lately.  After making my Turkey Cake Pops I thought it would be fitting to make cake pops for Christmas.  I did some Googling to see what everyone else has been making and found Christmas Trees, Snowmen, Santa Hats and Reindeer.  So I couldn't pick just one and decided to try them all out.  The Christmas Trees & Santa Hats were made with carrot cake.  The Snowmen and Reindeer were made with white cake.

 I made my own stars by melting some yellow candy discs with oil.  Then I put them in a piping bag with a cake decorating tip - #5 I think it was.  Then I let them harden.  I got my candy cane sprinkles at Michaels and my "snowflake" sprinkles at Jewel-Osco.  I dipped my trees in green then added my star followed by my sprinkles.  I loved how they turned out.
 The snowmen I made are different from the ones I had seen.  I went down a few aisles of cookies and candy to figure out what items I could use to help me make my snowmen.  The hats are Rolo candies dipped in red chocolate candy and then placed on a Keebler Grasshopper cookie.  I added a snowflake sprinkle that I got from Michaels.  The eyes and mouth are made with mini chocolate chips.  The nose is part of an orange Mike and Ike candy.
 Here is a close up.
 Another view of the hats.
 The Santa Hats were super simple.  I dipped them in red and let them harden.  Then I dipped the top and the edges of the bottom in white chocolate to give them the appearance of fur.
 Another view of the hats.
 And finally, the reindeer cake pops.  I used white cake for these and the snowmen.  I dipped the reindeer in chocolate and added a pretzel, red M&M candy and 2 mini chocolate chips for eyes.  The pretzel was the hardest part because when I tried to cut them they kept breaking oddly.
 A close up.
 And all 41 cake pops that I made initially.  I made 95 more a day later.  So 136 cake pops in all were made.
 Another view.
 Here are the cake pops bagged and ready to be eaten.
I made these for my husband's family and my family for Christmas.  I also have plenty left for sending to family and friends and for our neighbors.  Not sure what I'm going to do next year. I might have to return to my cookie baking.  I was a little disappointed in not being able to bake cookies but these turned out great!  I just didn't have enough time to make cookies too.  Oh well.  Merry Christmas!!

Friday, December 16, 2011

Good Night Moon Dipped Pretzels

To go along with the Good Night Moon Cake Pops I also make Dipped Pretzels.  I made White Chocolate and Regular Chocolate ones.  The sprinkles are blue stars with yellow moons.  I was very happy with how they turned out.  


I don't have photos of them individually bagged but I did do that and used a silver tie band to seal them up.  Who doesn't love chocolate and pretzels?!?  Oh so yummy!

Tuesday, December 13, 2011

I Passed!!!!

So I get home yesterday and am going through the mail and I see this envelope marked Health Department.  I'm thinking to myself why on earth would I be getting something from the Health Department.  Did they know my entire family was sick last week?!?!  Are they telling me that we are being quarantined for some weird disease?!?  Clearly the quarantine thought was just for fun.  But I open the envelope and see Congratulations you passed.  And I'm still like, passed what?!?  Then it hits me - the results for my Food Safety & Sanitation exam I took 4 weeks ago - it feels like it was months ago - has finally arrived.  Phew!  And I didn't just pass - I totally passed with flying colors!  Gotta love when you work so hard for something and the results show themselves!  Ahhh!!!  Now the relief has really settled over me. 

I just wish I had more time to bake.  I will be posting the dipped pretzels I made 2 weeks ago.  I just keep forgetting to get my photos.  Christmas is in full force.  I'm finally finishing up my Christmas Cards to get in the mail tomorrow and then I have a few Christmas gifts to make for my brother's kids.  Busy busy busy!  Hopefully I can start cookie baking this weekend!  I gotta get some fun Christmas cookies made before the holiday has come and gone!

Off to do some planning...

Tuesday, December 6, 2011

Good Night Moon Cake Pops

I recently made cake pops for a baby shower using the book "Good Night Moon" as their theme.  I made 3 kinds of cake pops: Carrot Cake with Cream Cheese frosting, White Cake with Buttercream frosting and Chocolate Cake with Buttercream frosting.  I made a total of 60 cake pops and used four main colors: red, green, yellow and blue.

 I drizzled the cake pops with multiple colors and think they turned out so perfectly!


 This is what the cake pops looked like after I added ribbon and bagged them up.  I denoted each color ribbon with the flavor cake that they were.  That way they still looked pretty and everyone knew what cake they would be getting.  Some people just don't like surprises!

Next cake pops I'll be making are for my parents' 50th wedding anniversary.  I found some cute gold edible sugar hearts that I'm going to sprinkle on the cake pops.

Friday, December 2, 2011

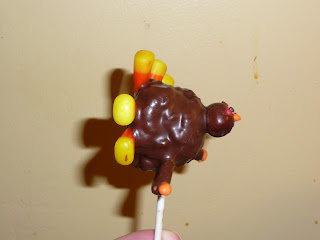
Turkey Cake Pops

Thanks to one of my close friends I got sucked into being on the bandwagon of those who make cake pops.  I had never heard of them until this past summer when my friend made monkey cake pops for her daughter's birthday.  Ever since, I sort of check out what holiday-ish cake pops I could make an excuse to attempt to make.  Since we were hosting Thanksgiving I thought how fun it would be to have little turkeys decorating the tables and also act as that little something sweet that everyone could take home.

 Here is the turkey all bagged up and ready to go home.
 I made a few adjustments to the way I made my cake pops.  Many people stick the pretzel sticks in after they dip the body.  I'm always afraid that my cake ball is going to fall off my stick.  So any kind of candy pressing into the cake ball is done prior to dipping as much as possible.  I added a Pretzel covered M&M as the head.
 I just used colored candy melts a piping bag and a small round tip to add the eyes, beak and the little gobbler as I call it - the jugular!  :-)
 The pretzel sticks I added a little bit of orange at the end to act as the claw feet.
Here is a view of the back.  I laid my candy corn down on wax paper and plopped my dipped cake pop onto the candy corn until the candy melts hardened.  Again some people choose to stick the candy corn into the cake pop.  I thought this was easiest and you could see the "feathers".

These were a big hit and I'm looking forward to making something for Christmas.  The ideas are already flowing!

Thursday, December 1, 2011

Pecan Pie

I'm back with a new post!!!  Here's my Pecan Pie - Looks can be deceiving!!  Okay okay - I won't be so harsh on myself.  The pie after all was down right delicious!  It was just a tad messy.  I've made this pie a handful of times and I've always used the trusted Karo Syrup back of the bottle recipe.


Luckily here's the recipe: http://karosyrup.com/recipe_details.asp?id=485  There is also a video on this website.  I definitely followed the instructions and the internal temperature of the pie was 200 degrees.  I guess next time I'll cook it a little longer.

This pie always reminds me of my Uncle Leo who passed away in 2002.  I think he would have liked my pie too if he had the opportunity to try it out.

Monday, November 28, 2011

Short Hiatus

I hate to keep you all in suspense or in the dark!  But I've been on a bit of a hiatus from baking for a few weeks because I spent a good portion of the first 2+ weeks of November studying for the Food Safety and Sanitation Certification exam.  I took the exam and unfortunately won't find out for another 2 or more weeks if I passed.  I am feeling pretty confident that I passed.  But I'm very glad and fortunate to have that done and under my belt! 

Last week of course was Thanksgiving!  I do have a couple of baking related items to share - Pecan Pie and Turkey cake pops!  The Turkey Cake Pops were a huge success!  I have to take a couple of better photos than what I have so I can give them a little more credit before I post about them.  The Pecan Pie was a success and a failure.  Success in that it tasted and looked amazing!  Failure in that when you took a piece out of the pie the insides all went mushy.  There was a major lack of firmness.  I'm not sure where I went wrong because I tested the internal temperature and it was at 200 degrees like the recipe said it should be at.  Oh well.  It was still rather good - even though I was the only one that ate any of that pie.  We had way too much pie on hand plus I don't think many of my family members are Pecan pie lovers.  Oh well. 

This week I'm working on Carrot Cake and Cream Cheese Frosting Cake pops!  mmmmm Yummy!  Plus some white and chocolate cake ones too!  Those are for a baby shower along with dipped pretzel rods with moon and stars sprinkles.  I'll be sure to post about those!

Until my next post!  Happy Baking!!!

Monday, October 31, 2011

Fall Cake - Cake Decorating Class 2 Final Cake

So I just finished my 2nd cake decorating class this past week - Gum Paste & Flowers.  It was really a very introductory class to gum paste and we didn't do very much with it.  But we did learn about a ton of flowers.  I had a vision of my cake from the 2nd class.  I knew since I would be ending the class right around Halloween I wanted to incorporate pumpkins into my cake.  So when I made my cake I made 3 mini bundt size cakes to act as my pumpkins.  The cake that the 2 pumpkin are sitting on are 2 8" round layers with chocolate buttercream frosting.  YUM!
All of the flowers are made with Royal Icing.  It dries really hard so it's really easy to put the flowers wherever you want.
We learned how to do the basket weaving at the last class and I'm so happy with how it turned out.
Here's just another view of the cake with the flowers cascading around and between the pumpkins.
And a top view of the cake.  I am so thrilled with how this turned out.  We cut into this puppy with my parents and two of my aunts this past weekend.  Of course I sent them home with the rest of it so my waistline can continue to shrink!  Happy Halloween!!!

Friday, October 21, 2011

Super Why Birthday Cake

So have you ever heard of Super Why!? I sure hadn't. It's definitely a kid thing. My little guy hasn't yet seen the Super Why series. But anyways, my friend asked if I could put two of the Super Why character on a cake for her son's 2nd birthday. I was up for a new challenge and appreciated the opportunity.

Here is a link to the Super Why website. I utilized their "design center" to get a poster of the two characters for the cake. Courtesy of the Super Why website this was what I used for inspiration on the cake.


And here is the final outcome of the cake:


My friend also said that her son loves the alphabet so I incorporated the alphabet along the sides of the cake.


The cake was a Chocolate Cake layered with an Oreo Cream Cheese filling. This is a large scale replica of the Oreo Mini Cakes/Cupcakes I posted about yesterday. I used a Chocolate Buttercream recipe to cover the entire cake.

As with every opportunity I get I always learn something new. In this challenge, I tested out painting on fondant. I used Wilton colors and lemon juice to paint with. A few things I realized while doing this was that 1) it is extremely challenging to get a skin color and a very pale pink color with the Wilton colors. 2) There were a LOT of colors for these characters. 3) I was pretty proud of my first attempt at painting on fondant.

I made my own fondant using a Marshmallow Fondant Recipe. I rolled it out very thin since it was just going to lay on top of the cake.

The challenge of the skin and pale pink colors made me be creative and pull in other colors to help mute it. For the skin color I used some yellow, orange, copper and brown. For the pale pink I added some purple and a tiny amount of yellow. When using white frosting it's definitely much easier to tone the color down.

Now I painted with lemon juice because it evaporates and doesn't leave a taste. You can also paint with clear vanilla extract but you will get a vanilla taste and you can paint with vodka which will also evaporate. I just happened to choose lemon juice because it was handy.

Thursday, October 20, 2011

Oreo Mini Cakes/Cupcakes

This past weekend we celebrated my husband's birthday.  I told him I would make him some goodies to take to work.  This was one of the goodies.  I also plan to make him Tiramisu cupcakes to take as well but this is the first round.
 It's a simple moist chocolate cake cupcake cut in half for the Oreo Cream Cheese filling.
 Then I added a small amount of chocolate buttercream frosting with a dollop of the Cream Cheese filling without Oreos and then added a 1/2 Oreo on the top for decoration.
Just look at that wonderful goodness!  I placed the cupcakes back into liners so it would be easier for my husband's co-workers to grab one for themselves. 

This idea I came up with after seeing a cake by Brown Eyed Baker: http://www.browneyedbaker.com/2009/06/25/cookies-cream-oreo-look-alike-cake/

I did not use the chocolate cake recipe in the link above but I'm sure it's just as good.

Monday, October 10, 2011

Apple Raisin Bars

I absolutely LOVE fall for the colors, flavors, smells but not for the allergies that tend to arise.  I live in the middle of farm country so now it's harvest season and the tractors are out in full force cutting down the corn making many people's allergies act up including mine.  Even my little baby has to have benadryl now and then.  But besides the allergy factor the awesome food factor and what is so readily available grows. Pumpkins and Apples GALORE!  I'm real big on apple desserts.  YUM!

So I was perusing through my Family Circle magazine - it's an old issue - about 2 months ago.  There was a section on apple desserts.  Oh be still my heart!  And one completely caught my attention.  Apple Raisin Bars!  You don't say?!?  Apples and Raisins oh my!  So I decided to make the super quick recipe to celebrate a co-worker's birthday - the only thing that took any time was dicing up the apples.  Otherwise this was the faster desserts I've made in weeks!  I added some powdered sugar to the top because what doesn't go well with powdered sugar?!?

 And I prefer to take my baked goods already cut when I take them to work so it's less fuss for my co-workers.  Look at that yummy goodness!
And here - the snow-capped bar!  Mmmm now if I could only serve this warm with some ice cold vanilla ice cream!  I can only imagine how much the wow factor on these bars would rise!

Saturday, October 8, 2011

Fire Truck Birthday Cake

Here is the final goodie for the Fire Truck Birthday Party - the main attraction - the birthday cake!!


The red is Homemade Marshmallow Fondant.  All the details were added using Royal Icing.  The Wheels are Oreo cookies - yum!

A tip I learned while taking the 2nd Wilton Cake Decorating course is to lather up your hands with Crisco (vegetable shortening) so that it will not stick to you or your surface when you go to roll it out.  It worked out so well.  Not too shabby for being my second cake that I used fondant on.

Oh and another tip, when I made the fondant I replaced the liquid I was to use to create the fondant with red food coloring.  It made the fondant come out so bright red.  Way better than "painting" it red with Wilton's color.